XNA Tutorial | Part 2
Welcome back Wildcard readers!
Take a look at the first variable. According to MSDN, GraphicsDevice performs primitive-based rendering, creates resources, handles system-level variables, adjusts gamma ramp levels, and creates shaders. In simple words, you don’t need to do low-level graphics programming with DirectX. In even simpler words, your life is made easier. And if you do want to learn low-level graphics programming, either find a tutorial in the internet or enroll in (the one and only) CS 177. Either way, you need to brush up your C/C++ skills.
For now, we will barely touch anything about graphics.
Now let’s look at SpriteBatch. SpriteBatch is what you call to draw your images on your screen. This is also where we specify the coordinates of the images.
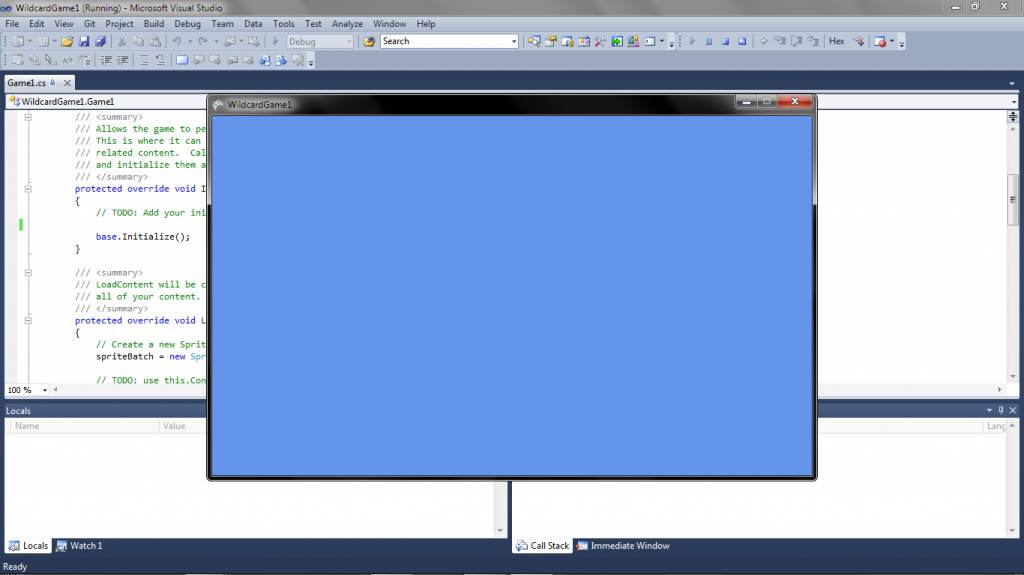
Now let’s try running the game. Press F5 or click the run button which looks like a play button.
Hurrah! It’s your first game! It’s a blank game with the default cornflower blue background. Every project will start with this screen. So let’s go back to the code.
Now let’s take a look at our code.
namespace is from C++. Just bear in mind that whenever we will create a new class file (.cs), we will enclose all of your code for the class in a namespace <project_name>{ … }, except for the ‘import’ statements (‘using’, in C#). Good news is that Visual Studio does it for you when you create a new file. If you are going to write a new class in the same file, put it inside the namespace curly braces.
Game1 : Microsoft.Xna.Framework.Game means Game1 extends Game. C# uses a colon (:) to denote either a class inheritance or an interface inheritance. If you took (and listened in) CS21a, you should remember this. It was in slide 13 when I took the course. Game1 extends Game means that there is a Game object doing the heavy work for you. Nice, right?!
Now, for the descriptions of the methods, please read the comments in the code. As much as you and I hate writing comments, they will really become useful when you are working in a big project, and more so when you are working with other people.
I will not explain what the public Game1() is, because there is CS21a/other tutorials for that; however, I will explain what those other methods are.
In Initialize(), you initialize whatever you need for your task. In a game, you may want to specify the number of enemies on the level, what level number it is, and other non-graphic stuff.
LoadContent() is where you load your image sprites. It is good to note that Initialize in the base method calls the LoadContent. This means that all your code in Initialize can be in LoadContent and the game will still run.
Update(GameTime gameTime)is where you tell the computer that an object has moved, say, enemy 190 has been killed by the player. Whatever you do here, shows up in Draw(GameTime gameTime).
Draw(GameTime gameTime) is what the player will see. This is how he/she will judge you as a game developer.
Now, if you want to unload stuff, then use UnloadContent().
So, let’s try drawing something on the canvas.
First of all, I recommend that you guys use PNG for your 2D sprites because it supports transparency and its memory size is actually quite small for basic images.
Here is Strawberry Derp. We will use him.
<Author’s note: please make Strawberry Derp available as a png image downloadable from the site.>
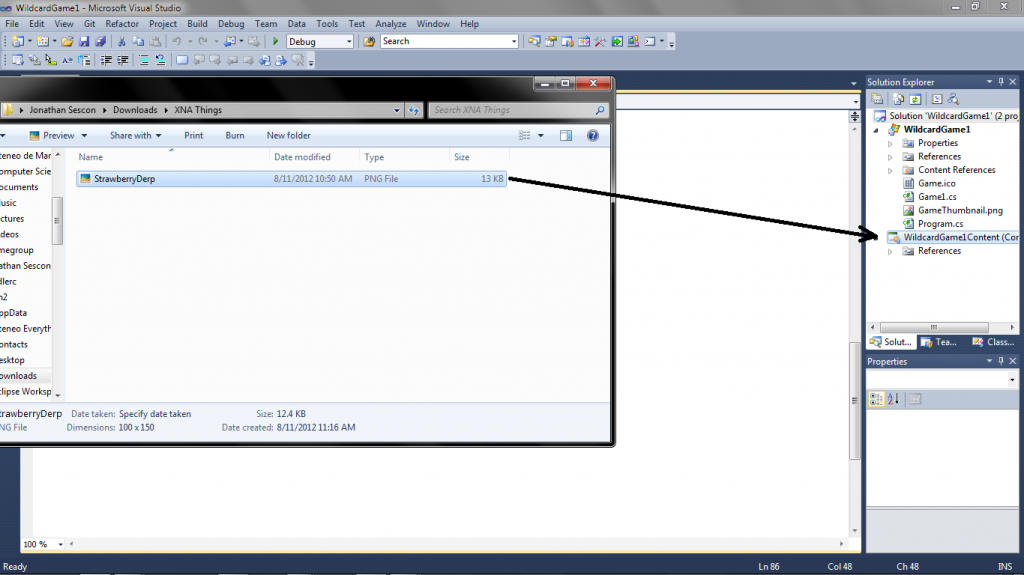
First, download the image. Open the directory of the file you downloaded, and then drag it to the WilcardGame1Content of the Solution Explorer in Visual Studio.
Drag-and-drop: it’s as simple as that.
*code snippet
Texture2D avatarSprite;
Vector2 avatarPosition = new Vector2(0,0);
*code snippet
Now let’s create a field for the image of the avatar. Let’s call it avatarSprite. All 2D images that we will use will be of the Texture2D type. After that, let’s create a new Vector2 variable named avatarPosition where we will, obviously, store the Avatar’s Position. For now, just do a big CS21a no-no and initialize avatarPosition in the field itself.
Let’s now go to LoadContent() and write the code below.
*code snippet
avatarSprite = Content.Load<Texture2D>(“StrawberryDerp”);
*code snippet
Preferably, you write it below this statement: “// TODO: use this.Content to load your game content here”, so LoadContent looks like this:
protected override void LoadContent()
{
// Create a new SpriteBatch, which can be used to draw textures.
spriteBatch = new SpriteBatch(GraphicsDevice);
// TODO: use this.Content to load your game content here
avatarSprite = Content.Load<Texture2D>(“StrawberryDerp”);
}
*code snippet
Now let’s go to Draw() and write the following code below this statement: “// TODO: Add your drawing code here”.
*code snippet
spriteBatch.Begin();
spriteBatch.Draw(avatarSprite, avatarPosition, Color.White);
spriteBatch.End();
*code snippet
So your Draw method will look like this:
*code snippet
protected override void Draw(GameTime gameTime)
{
GraphicsDevice.Clear(Color.CornflowerBlue);
// TODO: Add your drawing code here
spriteBatch.Begin();
spriteBatch.Draw(avatarSprite, avatarPosition, Color.White);
spriteBatch.End();
base.Draw(gameTime);
}
*code snippet
Yey! Now press F5.
// graphic here
Yey! It’s Strawberry Derp on the left corner of the screen, waiting for a chance to be something more than a sweet face pimpled with seeds.
Next step, we’ll make Strawberry move around. Stay tuned.


Comments